

UPDATE: March 2025 Some of these instruction may be a bit out of date by now, especially with the latest version of Raspbian and using a Raspberry Pi 5. I will publish a new version of this at some point. There is also a new version of the Raspberry Pi touchscreen now. The one other thing I’ll say here is that there are reports that Tiger, the provider of the URLs for the actual rail information, are not providing it for all Train Operating Companies. Consequently, I’ve recently switched to this website: https://digital-signage.live-departures.info/evocis/ They provide free access to departure information, and also offer bespoke solutions for companies who want branding alongside rail departure time (e.g. on a screen in a pub near a station). The other really nice thing they include is a “walking time” option, so that if you live 5 minutes from the station, departures within the next 5 minutes won’t be shown!
For ages now I’ve been meaning to put together a home dashboard: a screen that gives me up to date information about my local railway station with the departure boards showing.
A slightly bigger ambition was to have the dashboard also display times for nearby buses – and perhaps the weather and Twitter news feeds.
It should have been a relatively simple project, but it seems that live dashboards are either bespoke paid-for things, or are no longer properly developed.
Either way, I decided to do something relatively simple. There was something called dashing.io which is no longer maintained. In its place is a fork of it called smashing. But I couldn’t get on enormously with either.
What I specifically wanted was a dashboard that would be Raspberry Pi powered, and could make reasonable use of a small screen.
Some time ago I bought the parts, but it has been one of those projects that I started and failed to complete. So to get things going, I built a simplified version using the parts I already had:
- Raspberry Pi – I used a 3 Model B+ although the newer slightly smaller and cheaper Pi 3 Model A+ would probably work.
- A screen – I used an official Raspberry Pi 7″ Touchscreen. It’s only 800×600 and it’s a shame it doesn’t come at a slightly higher resolution.
- A micro-SD card.
- Optionally, I also used a Pimoroni Touchscreen frame to mount it all together. They come in a range of colours.
- A Raspberry Pi power supply. You’re probably best using a full 5.1V supply since there’s a fair bit of pull to power both the Pi and the screen together. Don’t rely on a cheap old phone charger. That said, mine is powered by a USB port of an Anker 60 W charger.
- You’ll also need a USB keyboard to set things up initially. The touchscreen will suffice for a monitor.
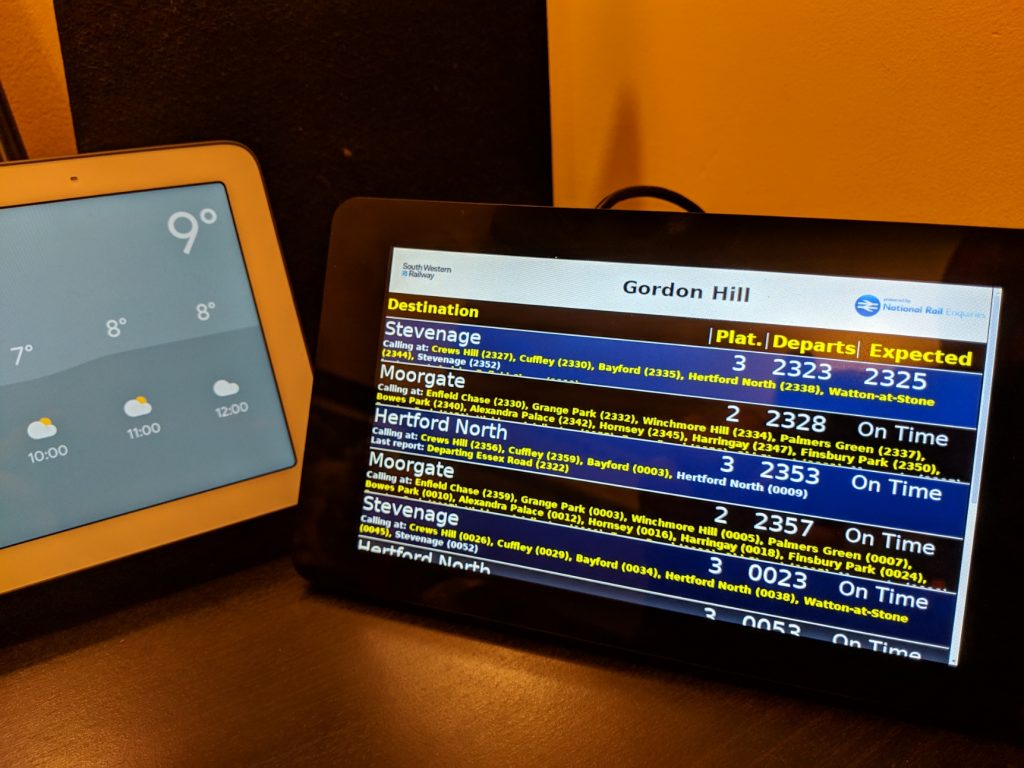
Now in another world, I’d design something a little smarter and use some nifty CSS to make everything look nice. But as you can see from the above picture, I didn’t do that.
The hardware is relatively straightforward, and in this instance there isn’t really any software to create or install. But there are still challenges!
I’d found a handy link on a Reddit forum that presents a station departure board, hosted by National Rail. [April 2021 Update – this is the new server for TIGER, the National Rail information system: https://tiger.worldline.global/home]
This is the page for Highbury & Islington station in London. [April 2021 Update – You’re better off using this version of the Highbury & Islington information – https://tiger.worldline.global/HGHI/cisds]
I strongly suspect that this link is using someone else’s API key. I suppose I should really get my own. But it seems to be working fine. As well as a User ID, there’s space for the all-important CRS code and a mysterious H value which I’ve not quite worked out. [April 2021 Update – If you use https://tiger.worldline.global/home you won’t be misusing anyone’s API key as there are none required for his new server.]
The key thing with this is that you need to find the CRS code for the station you’re interested in – the three letter code every station in the UK has. The list of codes can be found here. [April 2021 Update – Not required if you go through the TIGER link. Just search for your station.]
While the page is a little underwhelming in design, it does scroll if needed and has neat little features like telling you where the train was last reported, so you can live track your train.
So I had a basic website that I wanted to load up. Now it’s simply a question of launching the Pi on boot, straight into Chromium (the Pi’s default browser) and show the page fullscreen – or in so-called ‘kiosk’ mode. There won’t be a keyboard attached, and the idea is that the device does one thing, and does it well.
This seemingly trivial task took me an annoyingly long amount of time to work out, because lots of people do it lots of different ways, and it seems that some methods no longer work with the current default installations of Raspbian, the main OS for Raspberry Pis. If you’re a Linux expert, then much of this might be trivial. But I’m not, and for me it wasn’t!
That all said, in the end, by carefully following the steps on this page from Die Antwort, I got it all to work using their methodology. I can confirm that this works on the current version of Raspbian (the main operating system used on the Pi) – at least at time of writing.
Note that if you buy the Pimoroni frame as I had, then you’ll want to follow these instructions which tell you how to rotate the screen 180 degrees by default, since everything will otherwise be inverted. You can do this early on after installing the Raspbian operating system below; the precise orientation you choose will depend on how you want to place the screen.
The key thing here is to only install Raspbian Lite, which doesn’t actually include a graphical user interface. But if you go step by step through the Die Antwort instructions, you should get there.
A few things to note for those who are a little uncertain:
- Once you’ve downloaded the Raspbian Lite operating system, you’ll need something like Etcher to flash the OS onto your micro-SD card. Pop the micro-SD into your desktop computer and point Etcher at the downloaded file. Don’t worry if it’s a *.zip file – Etcher will handle that without you needing to unzip the file yourself.
- It’s worth turning on SSH when you set-up Raspbian for the first time, so that you can do most of your work remotely from another PC. If you’re not too familiar with this, it means that a program like PuTTY (on Windows) will let you remote into the Pi in console/terminal mode. That makes it easier to copy text from website guides straight into configuration files and the like. You will need to work out your IP address to do this. Type sudo ifconfig on the Pi to find out your IP address. It will probably next wlan0 and be of the form 192.168.1.x. These represent internal-only IP addresses.
- When you’re setting up WiFi, you need to know and spell your WiFi SSID correctly (That is, your router’s name). Unlike in graphical interfaces, you just type in your WiFi hotspot name rather than select it from a list of available ones. Type carefully! You also need to set your region so that the right WiFi frequencies are searched.
- When it comes to editing files, the Die Antwort instructions often don’t explicitly say that to edit a file, you should preface the file with sudo nano. e.g. sudo nano /etc/xdg/openbox/autostart in the ‘Openbox Configuration’ section. “Sudo” means act as a superuser or administrator, and “nano” is a basic text editing program in Linux.
- When you try out launching the screen, do so on the device itself and not via SSH. You can do everything else remotely, but you’ll want to plug a keyboard into the Pi to test when the instructions invite you to type startx — -nocursor.
- The thing that threw me most was in the section ‘Start X automatically on boot’ – in particular, I didn’t know where the .bash_profile file was to be found or stored. What you need to know is that it doesn’t exist initially and you create it by typing ‘sudo nano .bash_profile‘ from the default location.
- Nano is a real old-school text editor. But if you’re copying and pasting via SSH, it’s worth noting that right-hand click is paste rather than Ctrl-V as usual. To save it’s Ctrl-X, then Y for yes, and then Enter to save and close. If you’re typing directly into the Pi then type slowly and carefully.
- Don’t forget that you need to replace http://your-url-here with the link to your website. In my case this was a long link beginning http://realtime.nationalrail.co.uk/ldbcis/departures.aspx?u=…
One further amendment I needed to make to the Die Antwort instructions was to shrink the default Chromium zoom size a little. Because the Pi’s touchscreen is only 800×600, everything looked a little squashed on the screen. After experimentation, I chose 70% as an appropriate size to squeeze a bit more text onto the small screen. To fix this you should add some extra text to the Openbox configuration to scale the browser down, using the delineator –force-device-scale-factor=[decimal]. ie. for 70% of full size use:
chromium-browser --disable-infobars --kiosk --force-device-scale-factor=0.70 'http://your-url-here'When you test it’s also working, remember that you can break out of the page by pressing Ctrl-Alt-Backspace with a keyboard plugged into the Pi.
If you follow all these instructions carefully, you should end up with something similar to me.
This all gets me up and running, but there are lots more improvements to make!
- One additional one is the idea of cycling through several screens with different information. E.g. I might add a separate tab to Chromium with bus times. Then I can automatically cycle between the tabs to show different screens. There seems to be a route to doing this in these instructions. Note that other aspects of this page won’t work with the solution employed here.
- The biggest thing I’d like to change is not have the screen on the whole time. Indeed, during set-up we go out of our way to turn off the screensaver. Ideally I’d love to turn off the screen at certain times and turn it back on at others. This screen is most valuable for me during weekday mornings and at weekends. Outside those periods, I would be happy for it to be turned off, or just be awoken by touching the screen.
- Changing the look somewhat would be nice. Some personalisation of the style would be good.
- I think the South Western Railway logo in the photo above is related to the username I’m using.
- It would be great if I could load fewer departures on this size screen. Note that because I’m using a touchscreen, it is scrollable. But I’m not looking at a major London terminus so I only need a handful of departures at any given time.
As I said at the start I had previously had bigger ideas about putting together a much more comprehensive dashboard, but aside from the touchscreen’s low resolution not being really suitable for that, you’ll notice in the background that I also have a Google Hub, and to be honest, that takes account of a lot of my needs for things like time and weather (as well as photos!). That said, I’ve still not worked out a simple way to quiz Google Assistant about train departure times. On the other hand Amazon Alexa is great when you set up the skill for your “commute”, but is painful to use for anything else. So creating this departure board is actually a useful exercise.
Hopefully this will be of use to someone else. I’m pleased with the result. It could be better, but it does the job.
Update – January 2020
Ignore this update which basically doesn’t work and is full of inaccuracies. I will properly write up some notes on what I’ve done in the near future.
This project is still working fine, but I’ve made a couple of changes to thing. First of all, I’ve changed my feed to the “TIGER” system suggested by Paul in the comments.
It’s easy to search for your station, and then you’re provided with a range of options. I’m using CIS Detailed Summary Widescreen. Note that I did have to amend the scale to make it work. I’m now using 0.5 as below:
chromium-browser --disable-infobars --kiosk --force-device-scale-factor=0.50 'http://your-url-here'Next, I’ve use crontab to run a couple of things on regular basis. One of these fixes broken displays – when the website stops working. This most frequently happens overnight. So I’ve scheduled a daily reboot at 6.00am.
The other thing is scheduling time for the screen to be off. Again this is done in crontab.
Essentially, from a command line prompt, enter crontab -e. If it’s the first time you’ve run it, you’ll be prompted for an editor. Choose nano.
On the resulting screen you need to add three lines at the end of your file.
0 6 * * * reboot
0 22 * * * DISPLAY=:0 xset dpms force off
30 5 * * * DISPLAY=:0 xset dpms force on
Then press Ctrl-X to exit, save and close.
The first line says, at 0 minutes and 6 hours – i.e. 0600 – run a reboot. The three stars indicate date, month and day of week, but we’re not using them here.
The second line is the screen turn-off time. I’ve set mine to 2200 or 10pm. I’m unlikely to be catching trains after this hour.
The final line is the screen turn-on time. I’ve set this to 0530 which is early, but if I am catching a train at that time, I really need to know that they’re on time!
Note that I’ve scheduled the reboot when the screen is active, and at a different time to when I’ve scheduled it to come on. Hopefully this will save a bit of energy.
Obviously, I could have just not turned off all the settings that time out the screen due to inactivity, but I like to be able to glance at the information, and not have to interact with it first.
Update – April 2021
I’ve added in links to the new TIGER server – https://tiger.worldline.global/home – which began migration at the end of March 2021 according to a message on the previous page. It’s a good system with varying options for the level of detail you require.