
See update at the bottom if you’ve come to this from Google.
For some time now, I’d been meaning to create a little display that shows me the latest news. I’d had a Pimoroni Inky PHAT kicking around for a while, but it’d had broken.
For complicated reasons, I ended up with one of Pimoroni’s larger Inky WHAT displays. These are 4.2″ displays that have 400 x 300 pixels. They use e-ink which means that images stay on them even when they’re not powered.
This is basically a how-to, and assumes that while you’re competent with technology, you may not be a Raspberry Pi expert. I’m definitely not!
Requirements
For this project you will need:
- Raspberry Pi Zero W (i.e. the WiFi version), with GPIO ports. Since my soldering still isn’t up to scratch, I bought one pre-soldered.
- Pimoroni Inky WHAT. I used a black/white/red version, but you could save a little money and use a black/white version.
- Keyboard/Mouse/Monitor to set everything up. You may need HDMI and micro USB adaptors.
- Micro SD power supply. Just about any old phone charger will do.
- MicroSD card. 8GB is plenty, although 16GB is pretty cheap these days. Plus an SD/microSD card reader.
You could also build a case for the whole thing, or 3D print one! As the photo above shows, I haven’t.
You will also need to register with Twitter to create keys to use their API.
Desired Outcome
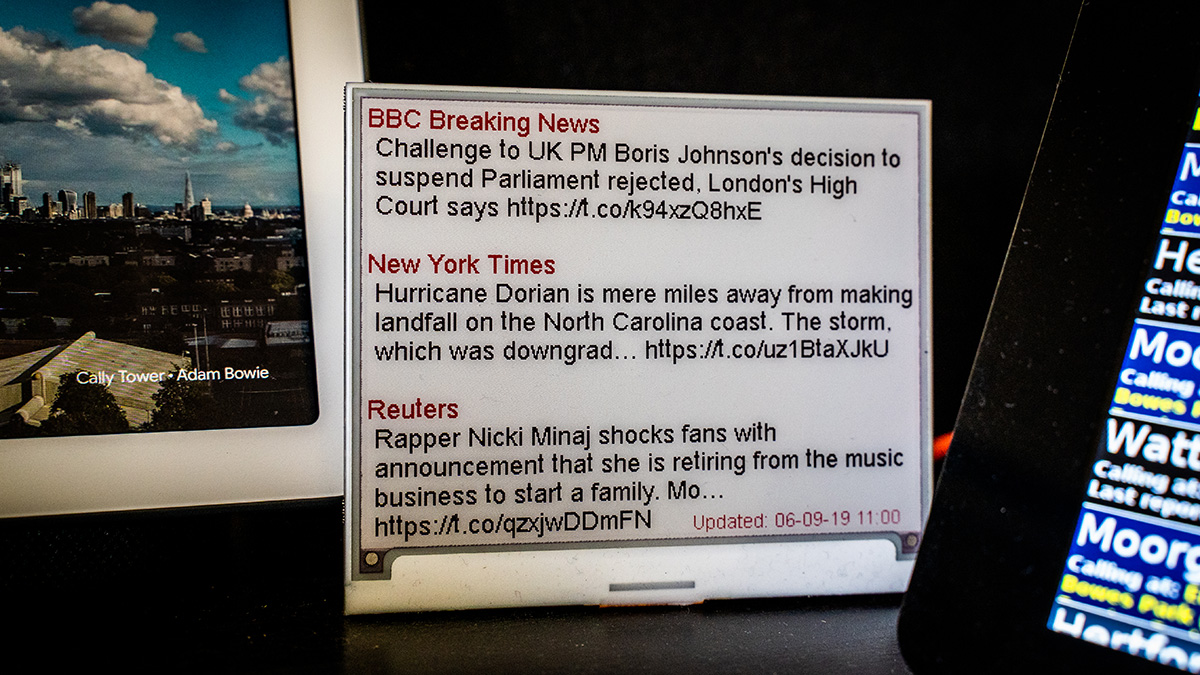
In this instance, given the size the of the screen, I wanted to display the most recent Tweet from three different news organisations’ Twitter accounts. In my case, the BBC Breaking news account, the New York Times main account, and the Reuters main account.
I would update the e-ink display – which appears much like a Kindle screen – every 15 minutes.
Coding
To display the information, I needed to grab the most recent Tweet from each organisation’s account, re-flow the Tweet so that I could make it run across the width of the screen in accordance with the font and font size I was using. Then finally display the font on the screen.
I was going to do this in Python.
I should point out up front that I rarely code and am not good at it. Furthermore, I’m terrible at remembering the syntax a language needs, even if I can understand roughly what’s going on.
So you to do all this, I needed to “borrow” code from a variety of sources.
I should also point out that I got this working in Python 2, because I couldn’t get things to work properly in Python 3. And for related reasons, I built the project with Raspbian Stretch rather than the recently released Buster.
To replicate all of this, first download an image of Raspbian Stretch. I used the one dated “raspbian-2019-04-09”. Download the 1.1GB zip file.
Then use a program like the free balenaEtcher to “flash” your zipped image onto a blank micro SD card. NB. If you do this on a PC, when it’s finished, you get lots of strange errors because PCs don’t like the formats of the card.
Slot your microSD card into your Pi Zero. Plug in a monitor and keyboard, and go through the steps of connecting your Pi Zero to a WiFi network and running some updates.
Open a command prompt on the Pi and run these updates:
sudo apt-get update
sudo apt-get upgrade
These in turn get the list of updates available, and then upgrade those packages you have installed. This is just good practice for anyone using any kind of Raspberry Pi.
To use the Inky WHAT, you need to turn on the Pi’s I2C interface. To do this, from a command prompt type:
sudo raspi-configMouse down to I2C and press enter. Turn it ON. And then Finish.
Now shutdown your Pi and you can fit your Inky WHAT.
When you’ve booted the Pi back up, you next need to install the software for the Inky WHAT. From a command prompt type:
curl https://get.pimoroni.com/inky | bashFollow the prompts all the way through. Maybe get a cup of tea. Or two.
[Note that it may take quite a while to install everything. Although I ended up running things on a Pi Zero, I actually did all the development and setup using a Pi 3+. Then it was just a case of using the resulting microSD card in a Pi Zero.]
To check that everything is working, you might want to follow the instructions on Pimoroni’s tutorial page, and get their quote generator going. That way you can be sure that software library is properly installed and all is well with the device.
Over on Twitter’s development site, you need to “Create an app” and give it a few details. They want to know a little about what you’re doing so fill in details as needed. We also really only need “Read” permission.
The important things that we need from here are details of the tokens. These need to kept secret, so don’t post them anywhere! Someone might use them to post as you if you’re not careful.
There are four long alphanumeric strings you need:
- Consumer API key
- Consumer API secret key
- Access token
- Access secret token
Save these somewhere safe, as you will need them in your Python code.
You also need to import a Twitter library into your Pi:
pip install python-twitterAnd here’s the main body of the code:
import sys,twitter
import datetime

api = twitter.Api()

# Populate your twitter API details below, replacing
# CONSUMER_KEY_HERE etc with your details from Twitter

consumer_key = 'CONSUMER_KEY_HERE'
consumer_secret = 'CONSUMER_SECRET_HERE'
access_token_key = 'ACCESS_KEY_HERE'
access_token_secret = 'ACCESS_SECRET_HERE'

api = twitter.Api(
    consumer_key=consumer_key,
    consumer_secret=consumer_secret,
    access_token_key=access_token_key,
    access_token_secret=access_token_secret
)

# This is all setting up the Inky WHAT

from inky import InkyWHAT

inky_display = InkyWHAT("red")
inky_display.set_border(inky_display.WHITE)

from PIL import Image, ImageFont, ImageDraw

img = Image.new("P", (inky_display.WIDTH, inky_display.HEIGHT))
draw = ImageDraw.Draw(img)

# I've used Arial as my font, and placed a copy in particular folder
# Choose your own font, and locate the Truetype font in relevant folder

font = ImageFont.truetype("/home/pi/Pimoroni/inky/news/arial.ttf", 18)
font_small = ImageFont.truetype("/home/pi/Pimoroni/inky/news/arial.ttf", 14)

# I've stolen this function from Sandy at Pimoroni. It's used
# in their quote generator example.

# This function will take a quote as a string, a width to fit
# it into, and a font (one that's been loaded) and then reflow
# that quote with newlines to fit into the space required.


def reflow_tweet(quote, width, font):
    words = quote.split(" ")
    reflowed = ' '
    line_length = 0

    for i in range(len(words)):
        word = words[i] + " "
        word_length = font.getsize(word)[0]
        line_length += word_length

        if line_length < width:
            reflowed += word
        else:
            line_length = word_length
            reflowed = reflowed[:-1] + "\n " + word

    # reflowed = reflowed.rstrip() + '"'

    return reflowed

# I used the code from here - https://zone13.io/post/python-code-latest-tweet/
# to grab the most recent Tweet

# I suspect that I could have created a function rather than repeat the following
# code three times. But I haven't :-)

# Note that I've hard coded in each Tweet.
# Also, because I'm using a "red" version of Inky WHAT, my text is
# either in red (for the source) or black (for the Tweet).
# Change your colours as necessary.


# BBC Breaking

def BBC_tweet(BBCBreaking):
	statuses = api.GetUserTimeline(screen_name="BBCBreaking")
	return statuses[0].text

if __name__ == "__main__":
	BBC_latest_tweet = BBC_tweet(sys.argv[1] if len(sys.argv) > 1 else 0)

	reflowed_BBC_latest_tweet = reflow_tweet(BBC_latest_tweet, inky_display.WIDTH, font)

	draw.text((0, 0), "BBC Breaking News", inky_display.RED, font)
	draw.text((0, 20), reflowed_BBC_latest_tweet, inky_display.BLACK, font)


# New York Times

def nyt_tweet(nytimes):
	statuses = api.GetUserTimeline(screen_name="nytimes")
	return statuses[0].text

if __name__ == "__main__":
	nyt_latest_tweet = nyt_tweet(sys.argv[1] if len(sys.argv) > 1 else 0)

	reflowed_nyt_latest_tweet = reflow_tweet(nyt_latest_tweet, inky_display.WIDTH, font)

	draw.text((0, 100), "New York Times", inky_display.RED, font)
	draw.text((0, 120), reflowed_nyt_latest_tweet, inky_display.BLACK, font)


# Reuters

def reuters_tweet(Reuters):
	statuses = api.GetUserTimeline(screen_name="Reuters")
	return statuses[0].text

if __name__ == "__main__":
	reuters_latest_tweet = reuters_tweet(sys.argv[1] if len(sys.argv) > 1 else 0)

	reflowed_reuters_latest_tweet = reflow_tweet(reuters_latest_tweet, inky_display.WIDTH, font)

	draw.text((0, 200), "Reuters", inky_display.RED, font)
	draw.text((0, 220), reflowed_reuters_latest_tweet, inky_display.BLACK, font)


# The following just inserts the last updated time
# in the bottom right corner.

now = datetime.datetime.now()
tweet_update = "Updated: " + now.strftime("%d-%m-%y %H:%M")
draw.text((230,285), tweet_update, inky_display.RED, font_small)


# At this point we finally show the information

inky_display.set_image(img)
inky_display.show()
The comments, delineated by ‘#’ symbols explain where you need to make your own changes.
Things to change include:
- Entering your Twitter keys
- Changing the Twitter accounts that you follow
- If you’re not using a red version of Inky WHAT, change references to “RED” to an appropriate colour
- Change the font to your own choice, and make sure there’s a copy of the font in the correct folder on your Pi.
Name the files something appropriate like twitter-news.py (the .py suffix for Python).
As I said, I have liberally borrowed from Sandy of Pimoroni’s sample code, in particular for the “reflow” function, and from here for the general latest Tweet code.
I almost certainly could have simplified this code, but I haven’t because I am a bad coder.
To run this from a command prompt type python twitter-news.py and with any luck your display should change. Note that it can take quite a few seconds first time around.
The final thing I wanted it to do was update the display every fifteen minutes. Linux has a useful crontab utility that will run programs in the background.
First of all you want to change the permission of your twitter-news.py script to be executable. If you don’t do this, only you can run it. From a command prompt in the same folder as your script:
chmod +x twitter-news.py[In case you didn’t already know, ls will show you what’s in a folder; cd folder_name will take you into a folder called folder_name; cd .. will take you up a folder level; mkdir folder_name will make a folder called folder_name]
Then we can use:
crontab -eThe first time you run this, you’ll be offered a choice of editors. Stick to nano.
Then scroll to the bottom of the file and add the following:
*/15 * * * * python /path/to/your/folder/twitter-news.pyObviously, replace “/path/to/your/folder/” withe actual path to where you’ve saved your Python script.
Save and exit from Crontab. This will run the script every 15 minutes – in fact precisely on the quarter hours. And it will do it as soon as the Pi boots up. You won’t need a keyboard or display plugged in.
And that should do it!
Flaws/Issues
One technical flaw is that I’ve hard-coded where the Tweets appear on the screen. But you can include carriage returns in Tweets, and they can run to 280 characters. So occasionally you get double-printing where a Tweet appears over the top of the following one. I guess the code could shorten Tweets to prevent this happening.
More fundamentally, different news organisation use Twitter in different ways. So I’m not sure this quite works as a “Breaking News” display.
As I said, I ended up using the BBC Breaking News feed, the New York Times feed, and main Reuters feed. But the BBC only updates their feed semi-regularly when something important is happening. You may go days without that feed updating. On the other hand, both the NY Times and Reuters update frequently, but the latest thing they Tweeted may not be the most important or leading story. They just rotate through stories that they want to promote – at least until a major truly breaking story emerges.
For a good example of this, look at the Reuters Tweet in my photo above. I don’t think that truly constitutes breaking news, particularly in comparison with the other two headlines!
Each of the Tweets tends to come with a URL that Twitter shortens. I guess I could have written some more code to chop the URL off, because it’s next to useless here. I can’t “click” through. But it doesn’t worry me too much.
So my screen is arguably flawed in the sense it just gives a flavour of what the news organisations are reporting or have been reporting. But during times of big breaking news stories, the three accounts are more likely to be aligned.
Conclusion
This was quite a fun project, and it was surprisingly simple to get things displayed.
I did run into problems getting this all to work under Buster – the new version of Raspbian. I think as much as anything because I wasn’t installing external libraries correctly for Python 3 which Buster seems to prioritise. But it’s possible that some of the display libraries haven’t been updated to work with Buster just yet.
I ended up using a larger Inky WHAT having “broken” my smaller Inky PHAT screen. I’d originally built a version that used the smaller screen and cycled through the three Twitter sources, displaying each in turn.
As it turned out, I’d actually only broken the micro SD card and not the screen at all. So now I need to think of something else to do with the smaller screen. I’m thinking of some kind of updating wearable badge connected to my phone.
But that’s for another day.
Note: The image above shows my Twitter News display between a Google Home Hub and my self-built Raspberry Pi based National Rail Dashboard. For details on how to build that, click here.
Update – August 2023: This ran fine for several years until finally Twitter was sold to Elon Musk and he basically killed the free tier of the Twitter API which this project utilised. My plan now is to re-work this using RSS feeds instead.