Pimoroni makes a wonderful little package called the Keybow which comes in 3 key and 12 key options. It uses a Raspberry Pi Zero on top of which sit some LED keys (there are both clicky or quiet). You can then program the whole thing to allow you to use keyboard shortcuts to do various regular tasks.
I wanted to make a Zoom controller for the video conferencing software so many of us have been using so much in the last year. In essence, I wanted to have one-button access to muting or unmuting myself, turning on and off my camera, and quitting Zoom altogether.
Sure, there are already keyboard shortcuts for all things Zoom. But can you remember them all? And some nice illuminated buttons makes things a bit easier. Plus, nobody enjoys the double red button press you need to leave a meeting (although I appreciate it’s to stop you accidentally leaving when you didn’t really want to).
I bought the 12 key option with the clicky keys, because they give you a very certain feeling that you’ve pressed the buttons. And who doesn’t like clicky keys? (OK – they’re not much fun if you sit near someone hammering away on a keyboard near you all day.)
Pimoroni supplies everything you need in the kit with the exception of a microSD card which you’ll need to add.
Assembling the Keybow is straightforward, and Pimoroni has a comprehensive guide which includes details on both assembling your device and getting your software up and running. If you’re used to playing with Raspberry Pis already, the one thing you need to know is that you format the microSD card as Fat32 rather than in the usual Linux format that the card creator software that the Raspberry Pi Foundation offers, or something like balenaEtcher would do normally. I used the links to the software Pimoroni suggests for formatting your microSD card.
There is no soldering required for this assembly, which might make life easier for some!
Once you’re up and running you find that it takes about 10-15 seconds to boot if you plug your Keybow into your PC (or Mac). Of course, if you leave it plugged in, this will happen pretty much in lock-step with your PC booting up.
Out of the box, the Keybow is set up as a number pad with the numbers zero through to nine, a full stop/decimal point and “Enter” matched to the 12 keys.
The default set-up also has each of the LEDs under the keys cycling through a set of colours.
Now I knew the hardware was working, I needed to work out how to re-program the Keybow to give specific operations for Zoom. I decided that I wanted the following functionality:
- Set all the keys I wasn’t using to white. Keys in use would be green by default. My big “Leave” button would be red.
- Have one key to Mute/Unmute myself – Alt+A on a PC
- Have one key to turn my Video on and off – Alt+V on a a PC
- Have one key to switch to Speaker View – Alt+F1 on a PC
- Have one key to switch to Gallery View – Alt+F2 on a PC
- Have one key to Quit or Leave a meeting – Alt+Q, followed by Enter on a PC
When changing to either Speaker View or Gallery View, I’d get the buttons to briefly show blue when they were pressed.
Furthermore, for the audio and video “toggling”, I wanted the button to change colour completely. In other words, Green for the default unmute/video on; blue for muted/video off.
Note: Actually, your default state will very much depend on the one you’re in when you’re invited into or create a meeting. Some invites will set you to mute by default. In which case, the button colours will be reversed. But a “dumb” keyboard controller can’t really take account of that.
Pimoroni provide some sample codes, including a set-up that might be useful for Lightroom. But I quickly found that while some things were simple, others were more complicated.
The way the code works is that a file placed in the root folder of the microSD card called keys.lua runs everything. In essence, it tells the Keybow which “layout” it should be using. Lua is a macro programming language – although I knew nothing of it when I got my Keybow.
Following Pimoroni’s file structure, the layouts were all stored in a folder called layouts. I created a new one and called it zoom.lua. I did all my editing in Notepad on a PC, which I know is a terrible coding environment, but then I’m not really a coder!
Note: I’m going to reference PC keyboard controls throughout this piece, but it’s simple to instead change things to a Mac keyboard controller. Pimoroni provides all the details.
The first thing I did was setup all the lights. Remember, that I wanted useable keys to be Green, by big bailout button to be Red, and the rest White. You can choose any colours in the RGB spectrum, and just need to come up with the numbers to determine the colours. You can use something like Photoshop for this, but there are also plenty of free tools. Here’s Google’s own one. It’s the three RGB colour numbers, each between 0 and 255 that you need.
The 12 key version of Keybow numbers its keys from bottom left to top right, 0 to 11, in a portrait orientation with the “Keybow” name at the top. But I wanted to use the controller orientated 90 degrees to a landscape form-factor. So “bottom left” for me would be key 9 and “bottom right” key 0.
It’s also worth noting at this point that Lua uses two dashes “–” to mean comments.
Anyway, here’s the first bit of code:
require "keybow"

-- Set lights to white except those keys with Zoom controls

function setup()
    keybow.auto_lights(false)
    keybow.clear_lights()
    keybow.set_pixel(0, 255, 15, 15) -- Red
    keybow.set_pixel(1, 255, 255, 255) -- White
    keybow.set_pixel(2, 255, 255, 255) -- White

    keybow.set_pixel(3, 255, 255, 255) -- White
    keybow.set_pixel(4, 255, 255, 255) -- White
    keybow.set_pixel(5, 255, 255, 255) -- White
    keybow.set_pixel(6, 15, 255, 15) -- Green
    keybow.set_pixel(7, 255, 255, 255) -- White
    keybow.set_pixel(8, 15, 255, 15) -- Green

    keybow.set_pixel(9, 15, 255, 15) -- Green
    keybow.set_pixel(10, 255, 255, 255) -- White
    keybow.set_pixel(11, 15, 255, 15) -- Green
end
The first line is required to program the Keybow, and then the setup() function’s first two lines turn off any other default lighting set-up. Without them, the Keybow uses a file named default.png which controls the colour scheme. Indeed, I found that if my code went wrong at any stage, it was then completely ignored and the default rainbow keys would light up because it had reverted back to the default.png colour scheme. Useful for bug hunting, since broken code meant that it kind of “gave up” and just gave me a rainbow!
So my keys were coloured correctly, but they don’t do anything yet.
The simplest coding was for the Gallery and Speaker views in Zoom. Here’s the code for them:
-- Switch to Speaker View (Alt + F1)

function handle_key_11(pressed)

    if pressed then

            keybow.set_modifier(keybow.LEFT_ALT, keybow.KEY_DOWN)
            keybow.tap_key(keybow.F1, pressed)
            keybow.set_modifier(keybow.LEFT_ALT, keybow.KEY_UP)
            keybow.set_pixel(11, 0, 50, 255) -- Set the light to blue

    else
        keybow.set_pixel(11, 15, 255, 15)
    end
end

-- Switch to Gallery View (Alt + F2)

function handle_key_08(pressed)

    if pressed then

            keybow.set_modifier(keybow.LEFT_ALT, keybow.KEY_DOWN)
            keybow.tap_key(keybow.F2, pressed)
            keybow.set_modifier(keybow.LEFT_ALT, keybow.KEY_UP)
            keybow.set_pixel(8, 0, 50, 255) -- Set the light to blue

    else
        keybow.set_pixel(8, 15, 255, 15)
    end
end
Basically it’s the same bit of code twice, but referring to keys 11 and 8, the two top left keys on the Keybow in the orientation I was using. The function handle_keynn(pressed) command tells the Keybow to run the code within that section if key number nn is pressed. Note that you need to include a leading “0” for keys 0-9 (ie. they’re keys 00-09). I learned that the hard way.
Then if the key is pressed, the first bit of code runs. It essentially sets the left Alt key (on a PC keyboard) to “down” with the keybow.KEY_DOWN expression, then “taps” the second key – F1 or F2 – before releasing the Alt key, putting it back in the keybow.KEY_UP position. Finally, it changes the key’s colour to blue.
However, as soon as the key is released, the “else” bit of the code will turn the key’s colour back to green.
In practice it means as soon as the key is pushed down, it turns it sends the computer an Alt+F1 or Alt+F2 command, and the key will stay blue while it’s depressed. As soon as it’s released, no further keyboard command is sent, but the key will revert to its green colour.
One other thing to note is that if you have something like Nvidia’s In-Game Overlay program running on your PC, which is very possible if you have an Nvidia graphics card, by default that application uses Alt+F1 and Alt+F2 for grabbing screenshots. I had to disable that functionality in the Nvidia program as otherwise I couldn’t get the keyboard shortcuts to work in Zoom at all for these two views. This of course is regardless of the Keybow being there. Similarly, you might want to check that other “global” applications aren’t duplicating Zoom’s keyboard shortcuts if you run into any strange issues.
The next bit of code is harder.
For the audio and video controls, I wanted the keys to start green, then turn blue on the first press, before turning back to green on the subsequent press. In other words “toggle” between green and blue. I’m sure regular coders quickly know what to do, but I had to go hunting and eventually I found the logic that I needed. So here’s the code for that bit:
-- Toggle variables setup for audio and video controls

key6pressed = false
key9pressed = false

-- Mute/Unmute Audio Toggle

function handle_key_09(pressed)
    if pressed then

        key9pressed = not(key9pressed) -- Reverse boolean value

        if key9pressed then

                keybow.set_modifier(keybow.LEFT_ALT, keybow.KEY_DOWN)
                keybow.tap_key("a", pressed)
                keybow.set_modifier(keybow.LEFT_ALT, keybow.KEY_UP)
                keybow.set_pixel(9, 0, 50, 255) -- Set the light to blue
        else
                keybow.set_modifier(keybow.LEFT_ALT, keybow.KEY_DOWN)
                keybow.tap_key("a", pressed)
                keybow.set_modifier(keybow.LEFT_ALT, keybow.KEY_UP)
                keybow.set_pixel(9, 15, 255, 15) -- Set the light to green
        end
    end
end


-- Video On/Off Toggle

function handle_key_06(pressed)

    if pressed then

        key6pressed = not(key6pressed) -- Reverse boolean value

        if key6pressed then

                keybow.set_modifier(keybow.LEFT_ALT, keybow.KEY_DOWN)
                keybow.tap_key("v", pressed)
                keybow.set_modifier(keybow.LEFT_ALT, keybow.KEY_UP)
                keybow.set_pixel(6, 0, 50, 255) -- Set the light to blue
        else
                keybow.set_modifier(keybow.LEFT_ALT, keybow.KEY_DOWN)
                keybow.tap_key("v", pressed)
                keybow.set_modifier(keybow.LEFT_ALT, keybow.KEY_UP)
                keybow.set_pixel(6, 15, 255, 15) -- Set the light to green
        end
    end
end
Again, this code snippet has essentially the same code twice – once for audio and once for video toggling.
First of all, I set up two “Boolean variables” – which I called key6pressed and key9pressed. Their initial state was FALSE. Boolean variables can only be true or false. What I needed to do was switch the state of them each time the key was pressed. Then depending on that state, change the button colour.
So if we look at the audio section where we mute or unmute ourselves, that’s on Key 9. If that key is pressed, the first thing we do is reverse the Boolean value. The code not(key9pressed) means that the value is now “true”. But next time the key is pressed it’ll revert to “false” and so on.
Then there’s an if statement. It’s checking to see if key9pressed is “true” – which it is at the moment. In which case, as before, we have code for Alt+A, and then the colour of the key is turned blue.
If the value of key9pressed is “false”, then the else code is run – again mimicking pressing “Alt+A”, but this time turning the key colour green.
There might be neater coding to do this, but this works!
The next section of code toggles video in exactly the same, but with Alt+V on Key 6.
The final bit of code needed is to exit out of Zoom. It’s a two-stage process unless you’re thrown out by the host (Don’t mess with Jackie Weaver!). But I wanted one key-press to do both things.
Alt+Q is the Zoom quit shortcut. But then you need to confirm it by pressing Enter. So here’s the code:
-- Leave meeting

function handle_key_00(pressed)
    if pressed then
        keybow.set_modifier(keybow.LEFT_ALT, keybow.KEY_DOWN)
        keybow.tap_key("q", pressed)
        keybow.set_modifier(keybow.LEFT_ALT, keybow.KEY_UP)
        keybow.sleep(500)
        keybow.tap_enter()
    end
end
For me, this is mapped to Key 0. The code is similar to that for other keys, replicating holding down the Alt key (the left-alt key in particular), and pressing q. But when that’s done it pauses for 500 milliseconds (half a second) before the Enter key is “tapped.”
In other words, the code strings together various key presses – quite powerful in itself if you have sequences of keys that you need to replicate.

Put everything together, and here’s my complete code:
require "keybow"

-- Toggle variables setup for audio and video controls

key6pressed = false
key9pressed = false

-- Set lights to white except those keys with Zoom controls

function setup()
    keybow.auto_lights(false)
    keybow.clear_lights()
    keybow.set_pixel(0, 255, 15, 15) -- Red
    keybow.set_pixel(1, 255, 255, 255) -- White
    keybow.set_pixel(2, 255, 255, 255) -- White

    keybow.set_pixel(3, 255, 255, 255) -- White
    keybow.set_pixel(4, 255, 255, 255) -- White
    keybow.set_pixel(5, 255, 255, 255) -- White
    keybow.set_pixel(6, 15, 255, 15) -- Green
    keybow.set_pixel(7, 255, 255, 255) -- White
    keybow.set_pixel(8, 15, 255, 15) -- Green

    keybow.set_pixel(9, 15, 255, 15) -- Green
    keybow.set_pixel(10, 255, 255, 255) -- White
    keybow.set_pixel(11, 15, 255, 15) -- Green
end

-- Zoom controls

-- Mute/Unmute Audio Toggle

function handle_key_09(pressed)
    if pressed then

        key9pressed = not(key9pressed) -- Reverse boolean value

        if key9pressed then

                keybow.set_modifier(keybow.LEFT_ALT, keybow.KEY_DOWN)
                keybow.tap_key("a", pressed)
                keybow.set_modifier(keybow.LEFT_ALT, keybow.KEY_UP)
                keybow.set_pixel(9, 0, 50, 255) -- Set the light to blue
        else
                keybow.set_modifier(keybow.LEFT_ALT, keybow.KEY_DOWN)
                keybow.tap_key("a", pressed)
                keybow.set_modifier(keybow.LEFT_ALT, keybow.KEY_UP)
                keybow.set_pixel(9, 15, 255, 15) -- Set the light to green
        end
    end
end


-- Video On/Off Toggle

function handle_key_06(pressed)

    if pressed then

        key6pressed = not(key6pressed) -- Reverse boolean value

        if key6pressed then

                keybow.set_modifier(keybow.LEFT_ALT, keybow.KEY_DOWN)
                keybow.tap_key("v", pressed)
                keybow.set_modifier(keybow.LEFT_ALT, keybow.KEY_UP)
                keybow.set_pixel(6, 0, 50, 255) -- Set the light to blue
        else
                keybow.set_modifier(keybow.LEFT_ALT, keybow.KEY_DOWN)
                keybow.tap_key("v", pressed)
                keybow.set_modifier(keybow.LEFT_ALT, keybow.KEY_UP)
                keybow.set_pixel(6, 15, 255, 15) -- Set the light to green
        end
    end
end

-- Switch to Speaker View (Alt + F1)

function handle_key_11(pressed)

    if pressed then

            keybow.set_modifier(keybow.LEFT_ALT, keybow.KEY_DOWN)
            keybow.tap_key(keybow.F1, pressed)
            keybow.set_modifier(keybow.LEFT_ALT, keybow.KEY_UP)
            keybow.set_pixel(11, 0, 50, 255) -- Set the light to blue

    else
        keybow.set_pixel(11, 15, 255, 15)
    end
end

-- Switch to Gallery View (Alt + F2)

function handle_key_08(pressed)

    if pressed then

            keybow.set_modifier(keybow.LEFT_ALT, keybow.KEY_DOWN)
            keybow.tap_key(keybow.F2, pressed)
            keybow.set_modifier(keybow.LEFT_ALT, keybow.KEY_UP)
            keybow.set_pixel(8, 0, 50, 255) -- Set the light to blue

    else
        keybow.set_pixel(8, 15, 255, 15)
    end
end

-- Leave meeting

function handle_key_00(pressed)
    if pressed then
        keybow.set_modifier(keybow.LEFT_ALT, keybow.KEY_DOWN)
        keybow.tap_key("q", pressed)
        keybow.set_modifier(keybow.LEFT_ALT, keybow.KEY_UP)
        keybow.sleep(500)
        keybow.tap_enter()
    end
end
Save that as zoom.lua and make sure that keys.lua in the root directory has something like this in it, with everything else commented out:
require "keybow"
require "layouts/zoom"
Note you refer to the file name as zoom and not zoom.lua in that code.
Save everything to the microSD card, load it onto the Keybow and plug it into your PC!
Obviously there are lots more keyboard shortcuts for Zoom you might want to replicate. And for the Keybow there are more complex coding options that let you map multiple sets of shortcuts to the same device. In essence, you could use a row of keys to change “pages” and use the remaining keys to act as shortcuts for each “page”. That way, you could use your Keybow to control Zoom, Lightroom, OBS or whatever else you want.
The other thing to note is that more recently Pimoroni released a cutdown version of the Keybow which is based around the new Raspberry Pi Pico. This is a much simpler offering, and theoretically could be very good. But I wasn’t able to master controlling it as well as the Keybow. Also, the rubberised keys have something of a ZX Spectrum controller about them. While some have worked out how to make it a USB controller, I think a bit more dev work is required before it’s easy for us users. You will want to know how to solder too, unless you buy a pre-soldered Pico. However, if you’re willing to play, it’s a much cheaper option. The Raspberry Pi Pico is less than £4!
Good luck, and hopefully this is all useful for some.
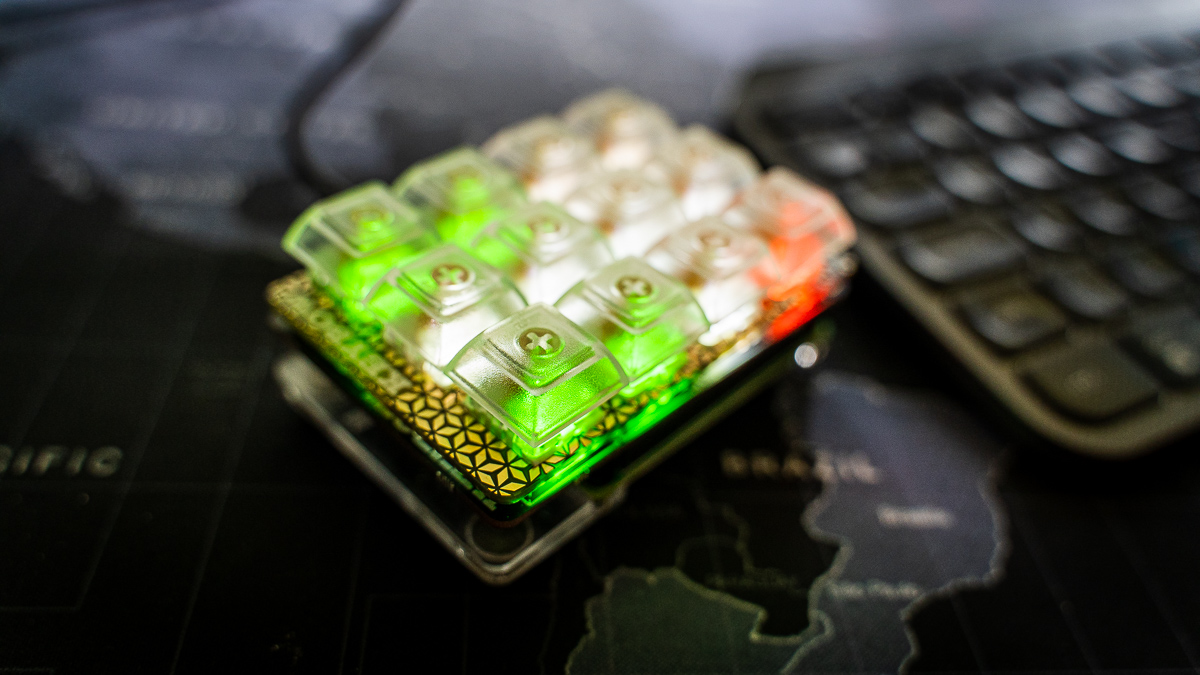
(And yes, in its default state, my Keybow does have something of an Italian flag about it)
Update: One small thing to note is that I did try to add a micro USB cable with an on/off switch between my computer’s USB and the Keybow – one of these. It was mainly because the Keybow’s lights are reasonably bright, and I have my Keybow plumbed into my computer via a USB host in my monitor. If I leave the computer either on, or in sleep mode, the lights stay on, although they do turn off if you shut down. So I thought it might be nice to have a simple on/off switch. Sadly, the switch seems to interfere with the computer recognising the Pi as a “keyboard” so it didn’t work, in that the computer no longer recognised the key presses at all. To be fair, this was always a possibility as the retailer does say clearly that the cable does not transfer data. Back to the drawing board on that.