
Back in 2019 I was quite pleased when I built an e-ink display which would display the latest news headlines from a handful of news providers. My solution utilised those outlets’ Twitter feeds. But now it’s mid-2023 and Twitter in its old guise is no more. More importantly with respect to that previous project, it relied on Twitter’s API to pull in the content.
But as we all know, earlier this year Elon Musk bought Twitter and has since largely speaking dismantled it. Now known as X, one of the first things he implemented was the removal of the free API tiers that existed before. Back in May 2023 an email suggested that my usage of the API (solely to view Twitter feeds on an e-ink display in my living room) made be a perfect candidate for their “Basic tier” that costs $100 a month!
It’s fair to say that I’m not about to spend $1200 a year on something that was basically a little weekend project utilising a few pounds’ worth of hardware.
So my display finally stopped updating, the e-ink screen left standing with the final news stories around the time that free access to the API was pulled.
I decided that I should re-write the code, and instead of using Twitter/X posts to update the display, I’d use old-school RSS feeds.
In many respects that’s a lot simpler. RSS feeds don’t require any API access, and can be pulled in pretty easily by anybody. I could use all the same hardware, and indeed, it was fairly easy.
I should preface all of this by saying that my Python coding skills are poor. But I was able to use a combination of code I’d written/borrowed before, and AI to get up and running! I used both Google Bard and Bing Chat to give me some basic syntax, and I was up and running.
Requirements
I’m posting a list of what I used, and they could possibly be replaced with other devices. But these have worked for me:
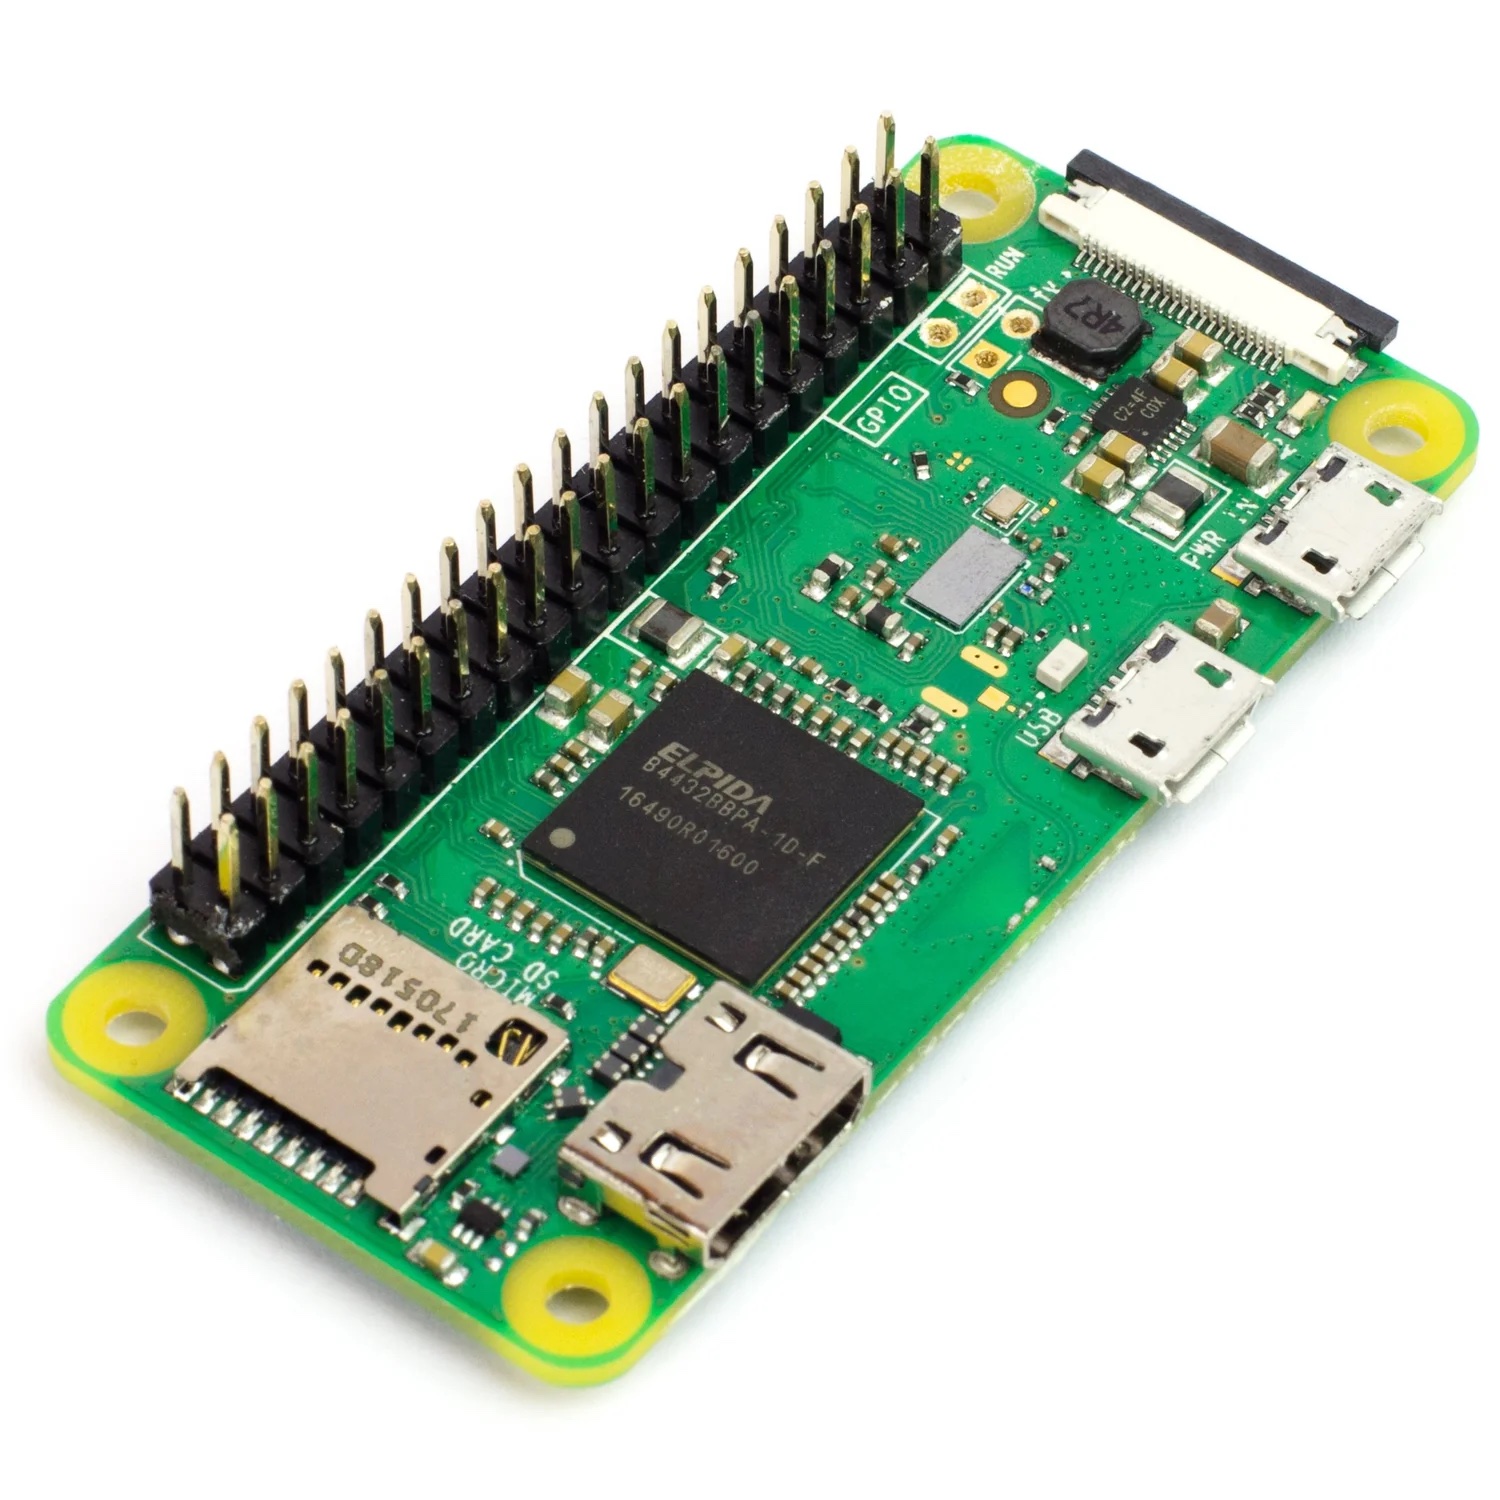
- Raspberry Pi Zero W with Headers. Note that you could also use any regular sized Raspberry Pi but that feels like overkill on a project like this that only has to run a tiny bit of undemanding code. The ideal would perhaps be a Raspberry Pi Zero 2 W, which would be much faster for hardly any more money, but at time of writing, we’re just reaching the end of a Raspberry Pi drought, and the Zero 2 W is about the last device that is in short supply.
The other thing to note here is that your Pi will need “Headers” – they’re the 40 pins that run along one side. The slightly cheaper versions of the Pi Zero models don’t come with them and require you to solder them on yourself. If you’re not experienced with soldering, then you should buy a Pi that already has the pins mounted. At time of writing the “With Headers” or WH models can be a little harder to find. Failing that, Pimoroni sell a “Hammer Header” kit that just requires a few gentle taps with a hammer to mount a set of pins using a plastic jig. I’ve found these to work well in the past even if hammering a computer board feels like something you shouldn’t be doing! - Micro SD Card. 8GB is probably enough, but I’d get at least 16GB for safety.
- Pimoroni Inky wHAT. This is the E Ink display that I’ll be using. It’s a 4.2″ screen with a resolution of 400×300 pixels. They come in Black/White, Red/Black/White or Yellow/Black/White options. I got the Red/Black/White version, but the slightly cheaper Black/White option would be fine. I would note that I’ve been running my wHAT for four years non-stop at this point, and you will notice that there is some degradation of the red colour. It’s particularly noticeable where the update time displays in the image above. Other than that, it still works fine, and black works very nicely indeed.
- Micro-USB Power Supply. Any should do, but I use an official Raspberry Pi device which is inexpensive and runs flawlessly.
In addition, during set-up you’ll need a keyboard, monitor and mouse as well as an HDMI cable, a mini-HDMI to HDMI adapter and a micro-USB to USB-A adapter (for the keyboard and mouse) – Pimoroni sells an inexpensive set if you need them. You’ll possibly need a USB hub too depending on what mouse/keyboard combo you’re using. A keyboard with an on-board USB hub can be useful here, such as the official Raspberry Pi keyboard.
Finally, you’ll need another computer and a micro-SD card reader to get your Pi up and running.
Operating System Set-Up
The easiest way to get your Operating System up and running is to use the official Raspberry Pi Installer software. It’s available on Windows, MacOS and Ubuntu. Download, install and run it.
The software is simple to use. In the first box, you choose the Operating System you want to install, in the second, the Micro SD card you want to install it to, and then the third box is “Write” the software.
For the Operating System, I’ve used the first suggestion – Raspberry Pi OS (32 bit). This is the full desktop version of the software. It would be entirely possible to use the “Lite” version of Raspberry Pi OS which runs without a desktop environment, but although this runs a little slower (especially on something like a Raspberry Pi Zero W), it’s the easiest version to work with if you’re new to the Pi.
In the second box, choose the Micro-SD card location. Ideally you’ll only have one card plugged into your PC. Be warned though, the card will be fully formatted (i.e. wiped) during this procedure. So go carefully if you’ve used the card for other things, and haven’t copied any data off it that you want to keep.
Before clicking “Write”, it’s useful to also click on the Gear icon. This is the advanced set-up, but it allows us to skip a few steps later on. You can give your Pi a unique name which can be useful if you’re looking to remote access it via another computer later. Importantly, you should also set-up the WiFi SSID (i.e. your WiFi network) and the corresponding password. This will get your Pi connected straight away.
You should probably also choose a username and password for your Pi.
Also enable SSH for remote access to your Pi using something like PuTTY on your PC or Mac. This can be useful if you need to change anything once you’re up and running.
Finally, you can set local language and geography settings.
When all of that is done click “Write” and wait for it all to download, install and verify. The Raspberry Pi Installer will alert you when it’s down and you can remove the card.
Hardware Set-Up
If you’re using an Inky wHAT like me, then you need to mount the 40 pins of your Pi to the 40 pin female dock on the rear. It’s a tight fit, but it should mount fine. If you’re using a Pi Zero W, then it should hold on quite easily without any further protection.
Insert the Micro-SD card, plug in your monitor, keyboard/mouse and power cables and wait for it to boot.
For the first boot this may take some time, so get a cup of tea!
When it’s finished, you should be looking at a nice on-screen display.
The first thing to do is get your software all up to date. Although you’ve just downloaded a fresh Raspberry OS installation, the software will need updating.
You need to run Terminal which is the black box near the top of the screen (Raspberry Pi OS defaults to the menu bar being at the top). Into the terminal type:
sudo get updateThis gets a list of all the software that needs updating. Once that has finished type:
sudo get full-upgradeThis is likely to take quite a long time – especially if you’re using a Pi Zero W. You’ll be asked to type “Y” to continue, and then the downloading installing will begin.
While all of this is happening, why not go and have a very leisurely cup of tea, and perhaps walk the dog or pop to the shops…
Now you’re nearly ready to get started. It’s always a good idea to reboot your Pi first, before proceding.
Now we need to get the Inky wHAT up and running.
First of all, we need to enable SPI (Serial Peripheral Interface) and I2C (Inter-Integrated Circuit) to get the wHAT to work. Open a Terminal window again, and type:
raspi-configThis brings up the Raspberry Pi’s Configuration options. Navigate to Interfaces, and from that menu you need to in turn enable both SPI and I2C. (I also tend to enable VNC from this menu which allows you to run VNC viewer from another computer and view the desktop environment via a remote window on your other computer. But it’s not so necessary with this project.)
Now install Pimoroni’s software. Again, in a Terminal window type:
curl https://get.pimoroni.com/inky | bashAlternatively, this should also work.
sudo pip install inky[rpi,example-depends]This should install all the software, as well as some example files. There’s more about these over on Pimoroni’s Github page. Also, this MagPi article is worth looking at.
We also need to install a Python library called Feedparser which will handle the RSS feeds.
sudo pip install feedparserOne thing to note here is that this terminology is correct for those using Buster, the current (as of August 2023) version of Raspberry Pi OS. Previous major releases of Raspberry Pi OS did not include Python 3 by default, and you had complications depending on whether you were running Python 2 or Python 3.
A lot of documentation around the web will reference “pip3” which is for Python 3 installations, but on the current Raspberry Pi OS, Python 3 is the default, so “pip” works fine.
I mention all of this because it confused me a bit, with seemingly contradictory instructions on how to carry out these installations.
With any luck you should be up and running. Now comes the code for our Inky wHAT display.
Code
I will once again re-iterate that I am a terrible coder, and this is cobbled together from other places.
You may well have really good improvements to make, or be able to create something a bit more graphically enticing!
import sys,datetime
import feedparser
from inky import InkyWHATinky_display = InkyWHAT("red") # Change this according to your wHAT model
inky_display.set_border(inky_display.RED) # Again change RED if neccessaryfrom PIL import Image, ImageFont, ImageDrawimg = Image.new("P", (inky_display.WIDTH, inky_display.HEIGHT))
draw = ImageDraw.Draw(img)
# Note that you need to have a font file installed. I'm using Arial here.
# Also note that the location of your file will depend on your
# username. Change "[USERNAME]" accordingly without square brackets
# e.g. to "pi"font = ImageFont.truetype("/home/[USERNAME]/Pimoroni/inky/news/arial.ttf", 18)
font_small = ImageFont.truetype("/home/[USERNAME]/Pimoroni/inky/news/arial.ttf", 14)# This function will take a quote as a string, a width to fit
# it into, and a font (one that's been loaded) and then reflow
# that quote with newlines to fit into the space required.
# I have borrowed this code!def reflow_feed(quote, width, font):
words = quote.split(" ")
reflowed = ' '
line_length = 0 for i in range(len(words)):
word = words[i] + " "
word_length = font.getsize(word)[0]
line_length += word_length
if line_length < width:
reflowed += word
else:
line_length = word_length
reflowed = reflowed[:-1] + "\n " + word
return reflowed# The code includes four RSS feeds. Make adjustments to each
# of these accordingly.
# Also change references to RED if you have a different wHAT model.
# First feedrss_url_1 = 'https://www.bbc.com/news/world/rss.xml'
feed_1 = feedparser.parse(rss_url_1)
most_recent_title_1 = feed_1.entries[0].titlereflowed_most_recent_title_1 = reflow_feed(most_recent_title_1, inky_display.WIDTH, font)draw.text((0, 0), "BBC News", inky_display.RED, font)
draw.text((0, 20), reflowed_most_recent_title_1, inky_display.BLACK, font)# Second feedrss_url_2 = 'https://rss.nytimes.com/services/xml/rss/nyt/HomePage.xml'
feed_2 = feedparser.parse(rss_url_2)
most_recent_title_2 = feed_2.entries[0].titlereflowed_most_recent_title_2 = reflow_feed(most_recent_title_2, inky_display.WIDTH, font)draw.text((0, 75), "New York Times", inky_display.RED, font)
draw.text((0, 95), reflowed_most_recent_title_2, inky_display.BLACK, font)# Third feedrss_url_3 = 'https://ft.com/world?format=rss'
feed_3 = feedparser.parse(rss_url_3)
most_recent_title_3 = feed_3.entries[0].titlereflowed_most_recent_title_3 = reflow_feed(most_recent_title_3, inky_display.WIDTH, font)draw.text((0, 150), "Financial Times", inky_display.RED, font)
draw.text((0, 170), reflowed_most_recent_title_3, inky_display.BLACK, font)# Fourth feedrss_url_4 = 'https://theverge.com/rss/index.xml'
feed_4 = feedparser.parse(rss_url_4)
most_recent_title_4 = feed_4.entries[0].titlereflowed_most_recent_title_4 = reflow_feed(most_recent_title_4, inky_display.WIDTH, font)draw.text((0, 225), "The Verge", inky_display.RED, font)
draw.text((0, 245), reflowed_most_recent_title_4, inky_display.BLACK, font)now = datetime.datetime.now()
last_update = "Updated: " + now.strftime("%d-%m-%y %H:%M")
draw.text((230,285), last_update, inky_display.RED, font_small)inky_display.set_image(img)
inky_display.show()I have placed all the code over on Github if that’s easier.
You should amend the code in a few places as noted, particularly with respect to the model of Inky wHAT you are using. The code is for the Red/Black/White model, so references to Red will need amending if you’re using something different.
You also need to amend the reference to the folder where your chosen Font is stored. I am using Arial in this example with the Arial.TTF font file. You may want to choose something different, and change the font sizes.
Finally, you will probably want to change the RSS feeds that you are monitoring!
Note that especially if you’re using a Pi Zero W, you may want to copy the code to a USB stick and transfer the file to your Pi that way using the built in File Manager.
Alternatively, do all of this coding on another computer, pasting it into a file using SSH.
To do this, use a program like PuTTY and SSH into your machine. You will need to work out the local IP address, or, if you named your computer in the set-up, then your address will be YOUR_UNIQUE_NAME.local (e.g. If you called your Pi “newsheadlines” then you will navigate to newsheadlines.local via SSH).
Your username and password will also be as set-up near the start.
Either way, save the file to something like newsfeeds_inky.py (with .py indicating that it is Python code).
Check It Works
Open a Terminal, and navigate to the folder you saved the file in.
(In case you didn’t already know, ls will show you what’s in a folder; cd folder_name will take you into a folder called folder_name; cd .. will take you up a folder level; mkdir folder_name will make a folder called folder_name. Alternatively, use File Manager to do most of this.)
Then type the following into a Terminal window:
python newsfeeds_inky.pyAnd wait. It might take thirty seconds or so, but it should clear the screen and then slowly display the headlines and sources. If you’re using a Red/Black/White version of the Inky wHAT like me, then the black appears first, and the red afterwards.
Note that these screens do refresh very slowly. It’s not as fast as turning the page on a Kindle!
Make It Run Automatically
The final step is to set things up so that the file runs automatically as soon as the device is plugged in. You can just power it up and leave it.
First of all, we need to change permissions on it to ensure that it is properly executable.
In Terminal type:
chmod +x newsfeeds_inky.pyNow we need to use something called crontab to run in the background and refresh the screen on a regular basis. I’ve set mine to run every 15 minutes.
In Terminal type:
crontab -eThe first time you run this, you’ll be offered a choice of editors. Stick to nano, the first option.
Then navigate to the bottom of the file that opens and add the following line:
*/15 * * * * python /path/to/your/folder/newsfeeds_inky.pyThis will make the program run every 15 minutes, precisely on the quarter-hour. Obviously you should change /path/to/your/folder/ to the correct path. E.g. /home/pi/inky/news/
Save and exit from Crontab.
I will leave it as an exercise to the reader to learn more about Crontab and how to change the code if you wanted it to run, say, every hour instead!
Now you can unplug any monitors, keyboard and mouse combos and other peripherals.
When you power up your Pi, the program should execute automatically in the background every 15 minutes.
Possible Issues
Remember that different news organisations use RSS feeds differently. In my case, I’m using mostly news outlets’ feeds, and some of them publish a lot of stories. The most recently published story may not be the most important!
So this isn’t quite a “Breaking News” machine.
On the other hand, big stories get written about more frequently, so it doesn’t do badly.
There isn’t a great deal of space, but I’ve only pulled the “Title” of each RSS feed entry. If you read something and are intrigued, you’ll have to use something else to go and read the full story. But if your news vendor of choice uses especially long “Titles” – perhaps for SEO reasons – then it’s possible that the text will overlap into the next sections.
Previously, when I used Tweets to power this, longer Tweets regularly overlapped into the next section down. I’ve not used any smart coding to overcome that, although that should be something that could be built in.
As things stand, I’ve hard-coded the positions of each feed based on the 400 x 300 pixels size of my screen.
Conclusion/Next Steps
I hope this is useful to a few people. E Ink is an interesting technology and there’s more to be done with it.
Because this project is so low-powered, I do wonder whether the even cheaper Raspberry Pi Pico W could power something like this. Pimoroni does have a full colour Raspberry Pi Pico W based 5.7″ E Ink display It probably comes to roughly the same cost as this project, and you get a bigger and better screen. It also has buttons to allow some interactivity. However, I did find someone who had a similar need, and their solution quickly exhausted the Pico’s built in memory. Nevertheless, the cost of the Pico Inky plus the possibility of running it for long periods of time on a battery opens up a lot of ideas.
I think that if I was starting again, I might explore the Pico options a bit more, that memory issue notwithstanding.